Tuesday 4 August 2015

Determining the Behavior and Usefulness of Plasma, their Uses in Daily Life, and Other Appearances


In order to determine the behavior and usefulness of the plasma, we have to take into account: 

  •         The type of atoms in the plasma
  •         The ratio of ionized particles to neutral particles
  •         The particle energies

These unique behaviors and usefulness result in different types of plasma, characteristics and behaviors which causes them to be useful in several applications in our daily lives and other appearances around the world.

Uses in our daily life:
  • Neon Lights
  • Fluorescent Lamps
  • Tesla Coil - A form of induction coil for producing high-frequency alternating currents

Tesla Coils
Neon Lights
Other appearances:
  • Lightning
  • Aurora - A natural light display in the sky, seen in the Arctic and Antarctic regions.
  • Solar Wind - A stream of charged particles, mainly electrons and protons, flowing outward from the sun, through the solar system at speeds as high as 900 km/s and at a temperature of 1 million degrees Celsius.
  • Stars
  • Interstellar clouds - Accumulation of gas, plasma, and dust in galaxies.

Interstellar Clouds

Solar Wind

Aurora


Kasen

What is Plasma?

Plasma is one of the four states of matter with the others being solid, liquid, and gas but plasma has properties that differ of the other three states of matter. They are by far the most common form of matter and are also estimated to constitute more than 99 percent of the visible universe.

Plasma consists of free-moving electrons and ions; in other words, atoms that have lost electrons after being ionized. Therefore, energy is needed to separate the electrons from the atoms to make plasma. The types of energy used are thermal, electrical, or light (ultraviolet light or intense visible light from lasers). Once there are enough atoms that have been ionized to affect the electrical characteristics of the gas, it becomes plasma. But with lack of sustaining power, plasma recombines to a neutral gas.


There are several properties of plasma. First of all, it conducts electricity due to having a significant amount of free-moving particles so that it responds strongly to electromagnetic fields. Secondly, it does not have a definite shape or volume unless it’s in a container which is similar to gas. Thirdly, the temperature of plasma is usually measured in Kelvins or electronvolts (the amount of energy gained or lost by the charge of a single electron moved across a potential difference of one volt) and very high temperatures are usually needed in order to sustain ionization.

Information links:
https://en.wikipedia.org/wiki/Plasma_(physics)#Definition
http://www.plasmacoalition.org/what.htm
http://www.plasmas.org/what-are-plasmas.htm
http://plasmauniverse.info/ubiquitous.html


Kasen

Introduction

For my topic that I will be working on, I chose to work on the topic of Plasma. Plasma is a very general term so I won’t be going into the specific points as it contains too many details that I can’t understand. So I’ll only be focusing on the more general and simpler points that define plasma.

In my second blog, I’ll be posting the information I’ve gathered from several websites that defines what plasma is. Then, in my third blog I’ll be posting information on determining the usefulness and behaviors of plasma; as well as their appearances or uses in our everyday life.

Finally, I’ll be compiling all my information on my topic into a short PowerPoint presentation.

Thank You.

Kasen

Monday 3 August 2015

The Magic of Nuclear Fusion and Gravity in Stars

A few days ago, we started to embark on our final chapter of Physics for the IGCSE curriculum- Nuclear Physics. As challenging as it sounds, Nuclear Physics is not as tough as it seems. After referring to the textbook and reading articles about the formation of stars, I have found out that the formation of stars are more closely related to Nuclear Physics than I initially thought it was.

The formation of stars involves nuclear fusion. Before this fusion even begins, gravity is needed to pull the materials needed to form a star- clouds of gases and dust. The simplified definition of nuclear fusion (gathered from the textbook and the internet) is the joining of two atomic nuclei to form a larger nucleus.

The baby steps to the formation of stars: 

  • Gravity pulls dust and clouds of gases together.
  • During this process, the volume of gases and dust increases, resulting to an increase in pressure.
  • When the temperature is at its optimum, nuclear reactions begin. This is when nuclear fusion is added into the equation.

*From what we learnt in Physics, an increase in pressure results in an increase in temperature.

These nuclear reactions are what fuels the stars, keeping the star glowing hot. During nuclear fusion, a massive amount of energy is given out. The temperature of a star at this stage can easily reach 3000K to 4000K.

*3000K or 3000 Kelvins is equivalent to about 2726.85°C. 

Nuclear fusion in stars:

There are several complicated nuclear reactions that occur inside a star. However, the most frequently occurring reaction involves hydrogen nuclei joining to form helium nuclei.

nuclei collide and fuse together
The formation of helium through nuclear fusion.

Conditions inside a star which allows nuclear fusion to happen:

  1. High pressure
  2. High temperatures
All that you have read here is just the 'main sequence' of the star's life cycle. The star is stable at the main sequence of its life cycle as the forces acting on it (pressure from hot gases and gravity) are balanced. During the next blog post, we will explore what happens when all the hydrogen gases are used up and how mass affects a star. A star may form a black dwarf, or a black hole upon its death depending on its mass.
Star life cycle
The life cycle of a star.

Sources:
http://science.nasa.gov/astrophysics/focus-areas/how-do-stars-form-and-evolve/
http://www.bbc.co.uk/schools/gcsebitesize/science/add_aqa/stars/lifecyclestarsrev1.shtml
http://abyss.uoregon.edu/~js/ast122/lectures/lec13.html
https://www.uwgb.edu/dutchs/AstronNotes/STARS.HTM

Thank you for reading
Joel


String Theory

Basically, string theory is trying to answer the age-old question of what is matter made from. For a long time, scientists as early as 600 BCE speculated as to what made up matter. Thales suggested that the world was made up of different forms of water whilst Anaximenes reasoned that the world was made of various forms of air. Democritus maintained that there was an indivisible particle called an 'atom', but his idea didn't take off as Aristotle proposed that matter was made of 4 elements: air, water, fire and earth. It was this idea of the 4 elements that held firm until the 1700s until modern science took off.

In the late 1700s, work by Lavoisier and Proust led Dalton to present a theory that all matter is composed of tiny particles called atoms. J.J. Later on in the late 1800s, electrons were discovered in cathode ray tubes which led scientists to think that atoms had a structure and had smaller parts. J.J. Thomson proposed the 'plum pudding' model of the atom (see Figure 1 below).

Figure 1: The 'Plum Pudding' model of the atom. (Source: https://upload.wikimedia.org/wikipedia/commons/thumb/2/26/Plum_pudding_model.svg/2000px-Plum_pudding_model.svg.png)

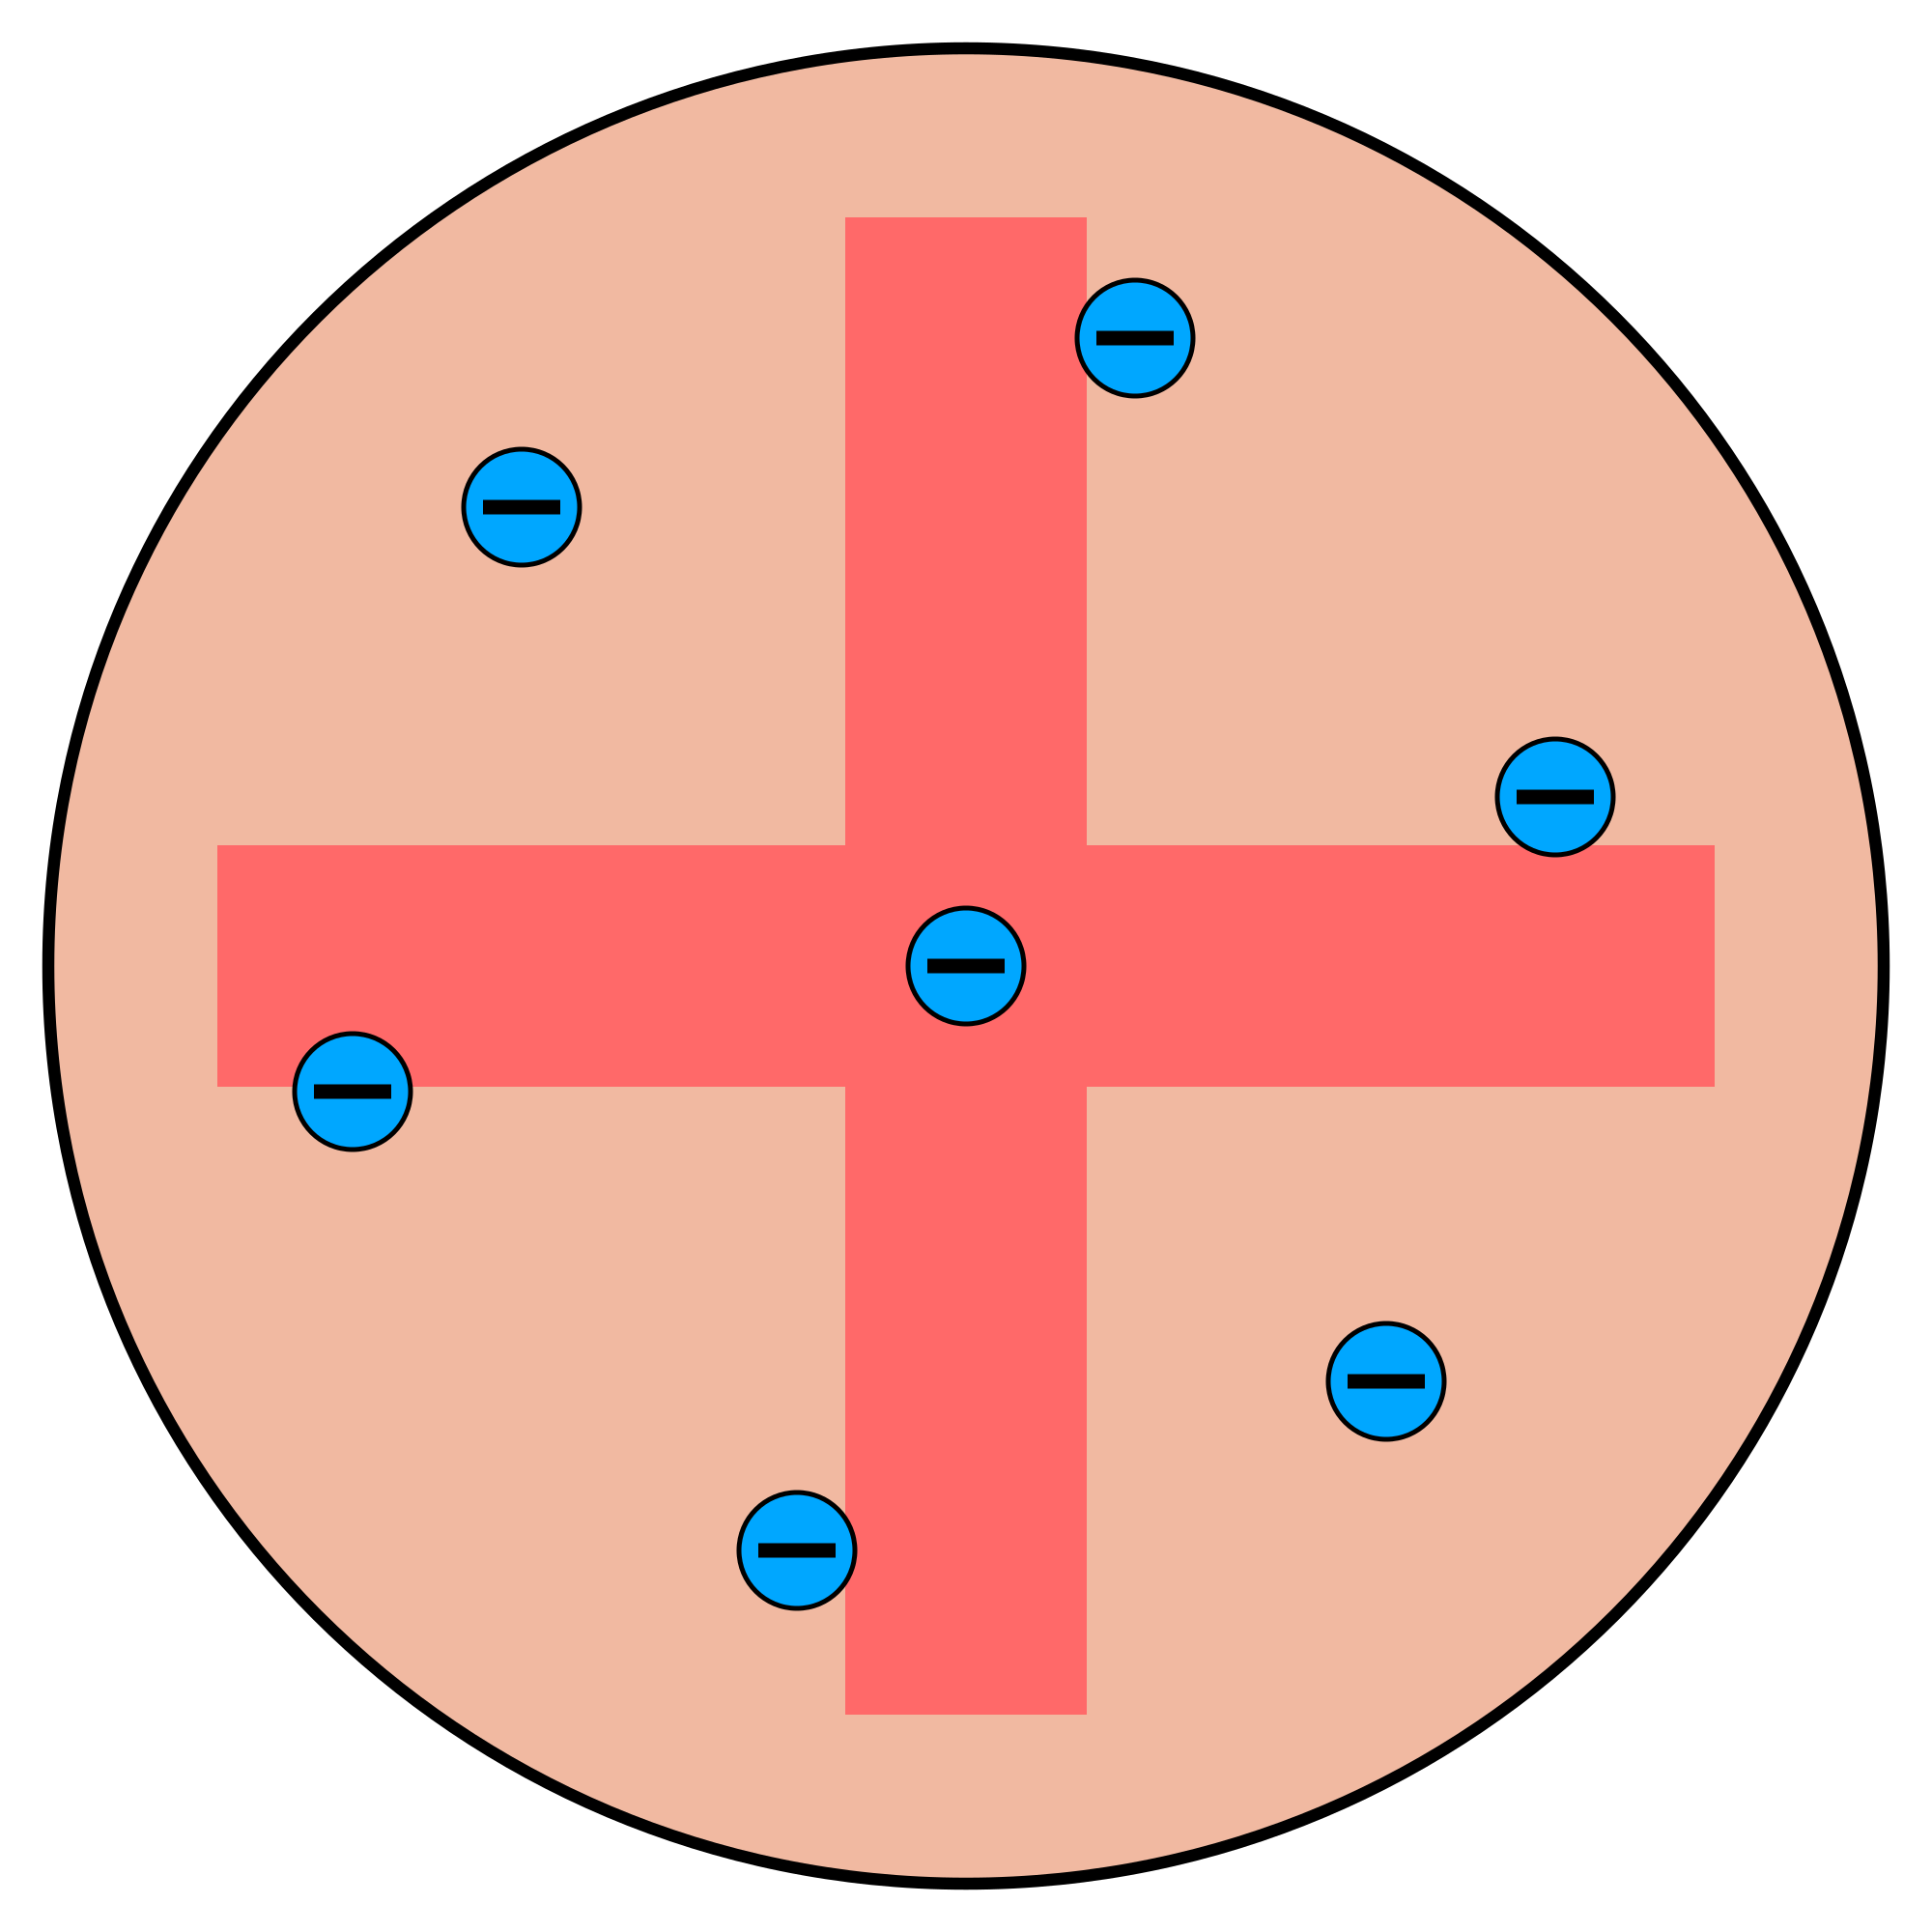
Another scientist called Ernest Rutherford had spent time working with radioactive materials and the radiation that they produce alongside Paul Viliard and decided to test Thomson's 'plum pudding' model. He hung up a very thin sheet of gold foil, surround it with detectors that could detect alpha particles (positively charged) and from the positions of the scattered alpha particles, he could decipher the structure of the atom. Rutherford found that most of the alpha particles passed straight through the gold foil, a few were scattered slightly deflected and a tiny amount bounced straight back (see Figure 2). He concluded that atoms were mainly empty space with all of the mass and positive charge and mass of the atom was contained in a tiny space at the very centre of the atom (see Figure 3). This space was called the nucleus.

Figure 2: Rutherford's gold foil experiment (Source: http://270c81.medialib.glogster.com/media/96/96afb330969ecc9eba4b9df5f3d79bfe2e406b92fbd04c183befd7b6fa226769/gold-foil-experiment.jpg)

Figure 3: The structure of an atom (Source: https://blogger.googleusercontent.com/img/b/R29vZ2xl/AVvXsEi17ih9BlDiJsg6dhWeIj5wppwp2VUwPMp38tc1RBfvomCHRgedUtFPfYQnMQKerHaQvXcXOhvV9szze0FLhgfB-Dys3J9kHdRnbcEm3yEUfXKYbaEz5pMKNIQlLgNZW8LMnzk75EsY1Ag/s1600/Rurtherford.jpg)

Protons and neutrons were later discovered and which gave a more accurate account of what the structure of an atom looked like (see Figure 4).


Figure 4: Neutrons included in the model (Source: http://images.tutorcircle.com/cms/images/44/atom(1).png)

However, physicists still were not satisfied with this model which lead to further theories and experiments about what made up an atom. In the 1960s, some ideas that protons and neutrons were made up of smaller particles were proposed and tested leading to the discovery of quarks in CERN in the 1970s. Physicists then came up with the 'Standard Model' suggesting that matter is made up of quarks, leptons and gauge bosons (see Figure 5).

Figure 5: The Standard Model (Source: https://upload.wikimedia.org/wikipedia/commons/0/00/Standard_Model_of_Elementary_Particles.svg

However, this model has been suggested as being 'complicated' and not fundamental enough and theoretical physicists have speculated that all these particles are made up of a fundamental entities called 'strings' and proposed string theory. String theory suggests that all particles are made of bands of different length (related to their energy) and suggest that the way the strings have been tied or if they are open or closed leads to different particles being created (see Figure 6).

Figure 6: How an atom could be made up of 'strings' (Source: http://scienceblogs.com/startswithabang/files/2008/04/3012_elegant_particles.gif)

In my presentation, I will outline the problems with string theory as well as explaining it in some more detail.

References
Riley, P. D. (2005). Checkpoint science 3. London: Hodder Education.
Smolin, L. (2006). The trouble with physics: the rise of string theory, the fall of a science, and what comes next. Mariner Books.

Forces of flight (continuation)

From Shawn

Hi everyone, welcome to my third and final blog post, in this post I would cover the remaining two forces that affect flight which are drag and thrust. In the last blog we looked at forces that affect the up and down movement of an aircraft, in this blog post we will discuss the forces that would cause an aircraft to move forward or backwards, and these two forces will also affect the speed and acceleration of the vehicle.

Drag: Drag is a frictional force that acts against an object moving through air, it is also commonly known as air resistance, as it opposes an object’s motion in the opposite direction. In order for an aircraft to progress forward, the drag must be smaller than a force acting in the same direction as the object’s motion, this would produce a resultant force forward. Drag is affected by the surface area of an object that is moving through air, the greater the surface area of an object, the greater the drag produced.


Thrust: The force results in a push that moves the aircraft forward, this force also opposes the drag force and if the trust is greater than the drag, the aircraft will progress forward. Most aircrafts acquire their thrust from the jet engines as these produce a large amount of force forward to counter the air resistance acting against the trust for the aircraft to move forward.


This concludes my blog regarding aerodynamics, apologies if the blogs are rather brief, this is largely due to the factor that the topic of aerodynamics is highly complex with several unfamiliar terms and formulas, therefore I have decided to look at it in a more simplified version. I have only focused on the forces in flight because I believe these forces link with the unit of forces and motion that we have studied in physics class already, this would create a clearer understanding and connection between these four forces and the crucial role that they play in the world of aerodynamics.

Thank you for checking out my blog! – Shawn Lai (Year 11 Bako)

Four forces of flight

From Shawn

Hello again and welcome to my second blog post regarding the four forces that affects flight, in this second post, we will look at the first two of four forces that has an effect on flight, this is a continuation from the post I did a few weeks ago regarding aerodynamics and its concepts.  As we have discussed in my previous post, aerodynamics plays an important role in our lives and one of those role is in the form of transportation. One of the vital forms of transportation in our lives is air travel, and air travel is dependent on the factor of flight, therefore today we will explore the four forces that allows flight to be possible. Keep in mind that the units for all these forces are in Newtons (N)
Weight:  The force of gravity acting upon an object, this force usually acts downwards as the object will be pulled with a force towards the centre of the Earth due to the attraction of Earth’s gravity.  For flight to be possible, this weight has to be countered greatly by an opposing force when the aircraft is taking off or flying in the air.


Lift: The force that causes an upward movement in the aircraft, the force acts upwards against the weight of the aircraft, and when the force caused by the lift is greater than the aircraft’s weight, this would result in the aircraft lifting off or increasing in altitude. In an Aeroplane, the lift is caused by the shape of the aircraft’s wings.

Lift in an Aeroplane’s wings: The shape of the aircraft’s wings are designed to change air pressure when in flight, it is able to do this because the top of the wing is curved more and the bottom of the wing is more flat, this causes air to flow over the top part of the wing much more efficiently than the bottom part. The result of this shape causes the air pressure on the top of the wing to be lower than the air pressure below the wing, therefore an upward movement would be caused due to the difference in pressure between the top and bottom parts of the wing.


Sunday 2 August 2015

Assembling a Computer Part 3 (Assembly)

Assembling a Computer Part 3 (Assembly)


After choosing your selected and desired components, its finally time to piece them all together.

Step 1: Mounting your motherboard

To start, open up your case's box, take out the case, and open it up. Usually this involves unscrewing a few thumb screws on the back of your case and sliding the side panels off. Take a good look around your case and get acquainted; note where the hard drive bays are, where your CD drive will go, whether the power supply mounts on the top or the bottom, and so on. There should also be a bag of screws inside your case; grab that now and set it aside because we'll need it in a few minutes.
Open up your motherboard box and take out the I/O shield, which is the metal plate that protects the ports on the back of your motherboard. You should see a rectangular space in the back of your case where this should go. Snap it into place. This takes quite a bit of force, so make sure all four sides are snapped in securely.
Next, pull out your motherboard and line up the ports on the back with the I/O shield. You should see that the holes on your motherboard line up with screw holes on the bottom of your case. There are probably more holes on your case than there are on your motherboard, so note which ones these are, and grab your motherboard standoffs from your bag of screws (they have a male screw end on one side, and a female screw hole on the other side). Screw the standoffs into those holes, and set your motherboard on top of them. Screw your motherboard screws into the standoffs so the motherboard is snugly mounted.

Step 2: Installing the CPU

Open up your processor's box and gently take it out. Your processor is one of the more fragile parts of the build, so this is one step in which you'll want to be careful. Find the comer of your processor that has a gold arrow on it, then look at your motherboard's processor socket for a similar arrowed corner. Line these two arrows up; this is the direction your processor will go into the socket.
Lift up the lever on the processor socket and put your processor in. Pull the lever down to lock it into place. Again, do this gently—it shouldn't require any feats of strength on your part, so if it isn't falling into place easily, something's wrong. Take it out and try re-setting it, make sure your two arrows are lined up, and of course, double check that your motherboard and processor are of the same socket type.
Once your processor's in, grab the cooler that came with your processor. It should already have some silver thermal paste on the bottom. If not, you'll need to pick some up from the computer store and put a very thin line on your processor—I usually use about the size of a grain of rice or two. Set your cooler on top of your processor. You'll need to press down on the four pins until they click.

Step 3: Installing RAM

Installing RAM is very simple. Find the RAM sockets on your motherboard, and pull the two clips on the side down. Line up the notch in your RAM stick with the notch in the socket, and press the RAM down into place. This might take a bit of pressure, so don't worry about being overly gentle. The clips should snap back into place when the RAM is fully in the socket.

Step 3: Installing the GPU

For your video card, find the topmost slot that fits your card and match that up with its plate on the back of the case. Remove that plate and slide the video card's bracket in its place. The card should then be sitting on top of the socket, and all you need to do is press down to lock it into place. Screw the bracket onto the case, and you're good to go.

Step 4: Installing the HDD

Every case is a little bit different in how they install hard drives. Generally, there are two methods: on some cases, you have to pull out a hard drive tray, put the drive in, screw it in securely, and then slide the tray back in. Other motherboards just require you to slide the bare drive into the bay and then screw it in snug after the fact. Check your case's manual for more detailed instructions on this particular step. If you're using multiple hard drives and a big case, it's usually a good idea to leave some open space between them—that is, putting them in the first and third bays instead of first and second. This allows for more airflow between them and will help keep them running cool.

Step 5: Installing the PSU

Once everything else is in, it's time to install your power supply and plug everything in. It should be pretty obvious where your power supply goes, as there will be a big rectangular hole on the back of your case. Some power supply's mount on the top, while some sit on the bottom of the case. Generally, they mount with the fan facing away from the edge of the case, unless that case has enough space in between the power supply mount and the end of the case to allow for airflow. Once you set it into place, you should see the holes on the back of the case line up with the screw holes in the power supply. Screw it into place and you're all set.

Step 6: Plugging everything in

This can be the most tedious and difficult part of the process, depending on your case and power supply. Separate the cords coming out of your power supply and plug them in individually.

 You should have:
A 24-pin Motherboard Cable: This is the biggest cable on the power supply, which gives the motherboard the electricity it needs to run. It has the very long plug with, you guessed it, 24 little pins in it. Most cases should have a 20-pin with a 4-pin on the same cable, so you can just put them together and plug them into the big 24-pin socket on your motherboard. It should lock into place, and might take a bit of strength to get it in all the way. Push it in until you hear the click and you can't pull it out with just a slight tug.

6-pin PCI Cables: If you have a rather powerful graphics card, you might have to plug it into your power supply. This requires the 6-pin "PCI" cable coming from your power supply, which should look similar to the 24-pin cable. Plug it into the end of your video card. Note that not all video cards require these cables, so if it doesn't have a socket, you can leave it be.

SATA Power and Data Cables: Your hard drives plug in via SATA, which contains two cables. One is the skinny black plug coming out of your power supply, which gives power to the drives. The other is a small red cable that should have come with your motherboard; this is the SATA cable that actually transfers data between your hard drive and everything else.

Molex Power Cables: Your Molex cables power other miscellaneous things in your build, like the case fans. Take the plugs connecting to your case fans and plug the male side into the female molex cable on your power supply. This takes a bit of force to get in, and even more force to get out.

Front Panel Audio, USB, External Port Connectors: Most cases have a few ports on the front, which can include but are not limited to USB, headphone, and microphone jacks. You should see some small cables coming out of the front of your case labeled things like USB, HD AUDIO. Plug these into their corresponding 8-pin headers on the motherboard—usually labeled USB, AUD.

Power Switch and LED Connectors: Lastly, you should have a few small cables labeled POWER SW, RESET SW, HDD LED, and so on. These connect the switches and LEDs on the front of your case to the motherboard, so you can actually turn your computer on. They all consist of only one or two pins, and all plug in on an 8-pin header somewhere on the motherboard. This varies from build to build, so you'll have to check your motherboard's manual to see how they all plug in. 


Note:  As you're doing all this, you want to be wary of where you're putting these cables. Generally, you want to keep them as out of the way as possible. The more they're tangled up in the middle of your case, the more they're going to block airflow from your fans, causing your computer to run hotter, louder, and possibly even overheat. Your case may have come with some zip ties to help you wrap them up and get them out of the way. Some cases even come with built-in cable management features, like clips or holes through which you route these cables to keep them out of the way.


Final Step: Turning It On

When you're done, plug in the power cable in the back, flip the power switch on, and press the power button on the front of your case. If all goes well, your computer should turn on and, if you plug a monitor into your video card, you should see what's called the POST screen. From there, you can head into your BIOS setup by pressing a key on your keyboard usually the Delete Key

Thank You for taking your time to read my final blog post! It's relatively long but I do hope its informative and beneficial. 


Lasers

This is my final blog post for Lasers. I'll be introducing the properties of lasers and how they work. Lasers is a short form for Light Amplification by Stimulated Emission of Radiation. 


Properties of Lasers:

Lasers are very different compared to everyday light. There are three properties of laser that make them differ from normal light. Laser light is monochromatic which means they have one specific wavelength of light or one color of light. The color of light is determined by the amount of released energy when an electron goes form an excited state back to its ground state. Laser light is also coherent that means that the photons move in with a group with other photons. They all have same wave fronts. Light is extremely directional. They are concentrated and only projected wherever the laser is pointing to.


How They Work:

A conventional laser comprises an optical gain medium, such as a gas, that is sandwiched between two mirrors in an optical cavity. The gain medium is sent through using an external light source of light or electric field such that most of its atoms or molecules are in higher energy excited states. 
When these states decay, they emit light that bounces back and forth in the cavity. This feedback stimulates the emission of similar light from other atoms in excited states. In the excited state, the electrons release their excess energy by giving off a particle of light or a photon. Electrons release their excess energy because they like being in the lowest state possible or ground state. Atoms that have the same electrons in identical states will release photons with the same wavelengths. Mirrors are placed at the ends of the medium being used. The photons emitted with certain wavelengths reflect off the mirrors and travel back and forth through the medium. The photons will stimulate other electrons to emit photons of the same wavelength. Not long after that, a lot of photons in the medium that all have the same wavelength. One of the mirrors placed at the ends is not a total reflective mirror. It reflects most of the light, but some photons get through the mirror. The light that passes through this mirror is the laser beam and a laser is finally created.

Magnetism (PART III)

Hi guys! So this would be my final blog post on the topic of magnetism. In this report I will be talking about electromagnetism.

Electromagnetism is simply magnetism produced by the flow of electric current. This means the magnetism can be easily turned on and off by controlling the current. Another advantage of electromagnet over a normal permanent magnet is that its magnetic force can be controlled by changing different factors while a permanent magnet has a set strength of its magnetic force.

If you want to find out the direction of the field around a wire, you can use the right hand grip rule as shown in the picture above. 

Ways to increase the strength of a electromagnet: 
i) Increase current
ii) Increase number of coils
iii) Use a soft iron core

Uses of electromagnet:
i) Motors, Generators 
ii) Relays
iii) Maglev Train
iv) Cranes in junkyard to sort out metals

Thank you for reading my blog and it has been a pleasure sharing my research with you.

- Kevin 

The link between sound and guitars

In this final blog, I want to touch on how sound is linked to guitars. On the previous blog, my research was based on how an electric guitar produces its sounds but now, I am going to share about acoustic guitars.
Similarly, the sounds produce by an acoustic guitar follows the same principles of the link between amplitude and volume, and the link between frequency and pitch.

The structural engineering of a guitar is indeed very unique. Although just made of wood and strings with high tensions, the guitar has managed to produce different sounds of different frequencies. There are normally 2 types of materials the strings are made if, making the sound very crucial, they are the nylon and metal (e.g steel).


This is the nylon string guitar having a softer touch effect and generally a softer sound.

These are the metal strings guitar that are generally louder because of the more vibrations it can produce.

But overall, the main factor that allows these sounds from the acoustic guitar comes from the wood and air hole. Imagine pulling a rubber band, there is hardly any sound, this applies the same to a guitar. The sound that we hear actually comes from the vibration of particles from the wood and air space, passing on its energy into our ears. There are many different type of woods that guitars are made of and some examples are mahogany, maple, rosewood and oak, moreover all of them giving a unique tone. 
This graph shows the sounds produce by the guitar in terms of time. It is very clear that the guitar does not give out perfect pitch sounds like an oscilloscope and this is the reason for its unique tones.   
Generally the pitch of the guitar depend of certain things.
1) The mass of strings
2) The tension of the strings
3) Free space of the strings
4) The vibration of the strings

The final thing I would like to write about is the sound linkage and frequency. 

Theses are all the notes of 1 octave in a guitar fret board. Each fret that a player presses on, produces a frequency that results in all these different pitches.

Generally, the sound of a guitar follows the physics formula of Frequency=Speed/Wavelength.
That is why when a guitarist moves up the fret board, the pitch gets higher because the shorter the wavelength, the higher its frequency. The thicker the string, the slower it moves,explaining why the thicker ones produce a smaller frequency,giving a smaller frequency.

The 2 ends show the whole wavelength of guitar. 


As we follow a certain formula, we can calculate what pitch the guitar would give when we press of a fraction of the whole fret board.


    scale position touchedfraction of string length

    octave1/2

    fifth1/3

    fourth1/4

    major third1/5

    minor third1/6

    augmented fourth2/7

    minor sixth3/8

    major second1/9

This is the general formula which guitarists use. For example, if the guitar has 24 frets, and you press on the 12 fret, it would give you the same note but one octave higher. This sequence is indeed a complicated series which requires a proficient musical knowledge such as the major second of a C being a D etc.

To conclude, there is more to a guitar then I have just mention. There are more complicated formulas and information which goes into a very high level of physics. These blogs has indeed help me to understand that there is a science behind the instrument I play.

Thank You
Elijah Wong

Sources:
http://newt.phys.unsw.edu.au/~jw/guitarintro.html
http://newt.phys.unsw.edu.au/jw/strings.html
http://ideastations.org/science-matters/sites-and-wonders/guitars-sounds-and-science
http://www.businessinsider.my/physics-guitar-mystery-oxford-rockstar-rock-music-2014-9/#JMCgmKZtilT2lxdJ.97
http://www.premierguitar.com/articles/The_Science_of_Tone
http://www.soundonsound.com/sos/may02/articles/cholakis.asp
https://www.google.com/search?q=guitar+fretboard&espv=2&biw=1366&bih=623&source=lnms&tbm=isch&sa=X&ved=0CAYQ_AUoAWoVChMIvNGEvbyKxwIVSFCOCh1xJgwY#imgrc=6UoVO0hJrvsbwM%3A


Music Production, Sound Design & Audio Mixing (Part 3)

Recording
 Each instrument of a track is recorded separately and sequenced together in the sequencer. The reason they are recorded in this manner is to give the music producer more control over the mixing of each instrument and to prevent unwanted frequencies to appear in the drum track. Think of it like this, you record a guitar track and a drum track in the same room at the same time. Of course, you will hear the guitar in the drum track (and vice versa), thus adding unwanted frequencies and making it really difficult to mix the drum track as you cant remove the guitar completely from the recording.

Sequencing
 Sequencing isn't just placing audio files and MIDI patterns, it also involves the use of automation clips to make things more lively in a track.

An automation clip
 Automation clips move linked controls in the mixing console e.g volume, stereo panning, effects and etc. They can also be used to manipulate the controls of a software instrument (e.g attack, sustain, release, decay, volume, etc, etc,). However, they are mostly used in electronic music production and are rarely used in organic music production.

Mixing

 Mixing is the most important part of music production, and is also one of the more difficult parts. It is the part in which all instruments are mixed down to make them "fit" into the track seamlessly. Every song is mixed differently, due to the many factors, the main one being that not every song is the in same genre and the instruments all sound different because of different recording equipment, added effects or the instrument itself is just made differently. Which is why mixing requires a really good listening skills and of course, really good listening equipment (e.g. headphones, studio speakers/monitors).  

 The most helpful advice I've received was that mixing should be done below -6dB. After doing so, I've heard a big improvement in the sound of my track. The reason why is mostly because it's easier to control the volumes and the master track (which is the audio file that gets exported) does not get distorted . Later on, the track will go through mastering (retouching) to bring up the volume of the 
master track and to retouch certain parts of the track such as the bass, treble or mid-range frequencies. 

What is used in mixing?

Fabfilter Pro-Q 2. An example of a software equalizer.
 Mixing involves the use of various equipment (a lot of them now in software version). The most important one being equalizers, which is what producers use to remove or reduce the amplitude of unwanted frequencies. it's commonly used together with spectrum analyzers.

Audio Compressors (used for dynamic range compression) are also somewhat used in mixing, simply, it lowers or raises volumes when it hits a set dB level, they're used in various fields In mixing, It's mainly used for side-chaining (a compression technique used for the ducking of an instrument)


Gyraf Audio Gyratec X - An analogue audio compressor.
 How does side-chaining work? The compressor is linked to one channel and then said mixer channel is linked to a 2nd channel, so that the first channel would send a signal to the latter channel. Once the volume of the 2nd channel reaches a certain level, the volume of the former channel (the channel with the compressor) is reduced. Besides side-chaining. There are various other compression techniques such as parallel compression, multi-band compression and serial compression.


A Spectrum Analyzer
 Spectrum analyzers are also commonly used in mixing, together with the equalizer. As the name suggests, it's used to analyze the frequency spectrum (the range being 20Hz-20kHz) of a sound. When mixing, it's mainly used to find unwanted frequencies or frequencies peaking at an unwanted level. It's also used to identify clashing frequencies.
Also it's helpful for those starting out with music production, mainly because most people who start out have no idea what goes on in the frequency spectrum of a sound or have listening equipment that are unreliable for mixing due to frequency response enhancements (e.g. Bass boost)

Thanks for reading, I hope this blog helped you understand more about the world of music production. I tried to keep it as simple as I can. 

- Dareil 

Physics of Skateboarding: Ollie

What is an Ollie?

  • An ollie is another basic trick for skateboarders to open up the gates of doing other harder tricks such as frontslide 180, pop shove it, heel flip, kickflip, and others. This trick is a jumping technique for the skateboarders to jump over a curb, a crack or other obstacles. 
How to do a stationary Ollie?
  1. Stand on the board. The weight (acting downwards) of the skateboarder, the weight (acting downwards) of the board and the ground's force (acting upwards) should all balanced out to zero.
  2. The skateboarder will have to crouch down to get a lower center of mass (to jump higher) when apply a greater downwards force on the tail of the board than the nose of the board. This causes the board to pivot counterclockwise at the back wheel. 
  3. When the tail of the board hits the ground, the ground automatically exerts a greater upward force causing the board to fly upwards as the board bounces off the ground. At this moment, the board now pivots clockwise around the center of mass of the board itself.
  4. The board is now completely in the air. The skateboarder will have to slide their front foot forward to drag the board even higher. This happens because of the skateboarder's foot produces friction (grip-tape) when sliding their foot forward.
  5. To level out the board, the skateboarder will have to push board down with their front foot while the other foot rises to prevent from adding other forces. This motion makes the board seem "stuck" to the skateboarder's feet.
  6. When the board is leveled, gravity will pull both skateboarder and board downwards - landing on the ground. To prevent any injuries, the skateboarder will have to bend their legs to absorb the impact of the landing.
Picture of how an ollie looks like.

Sources used:

http://www.exploratorium.edu/skateboarding/trick02.html

https://www.youtube.com/watch?v=vLrsMflKaDw

https://www.youtube.com/watch?v=C2GN8K0jw1E

google pictures

by: A'

Physics of Skateboarding: The Hippie Jump

What is the Hippie Jump?
  • The hippie jump is the most basic trick where the skateboarder jumps while the skateboard is constantly moving on a flat horizontal surface, then lands back on the skateboard itself.
How to do the Hippie Jump?
  1. Skateboarder will have to push the board with one of their foot and ride the skateboard on a flat horizontal surface at a certain velocity.
  2. Jump while riding the board, without exerting any forward or backward force on the board. To do so, the skateboarder will have to apply downwards force to be able to push themselves upwards which does not affect the forward velocity of the board and the skateboarder. Therefore the skateboarder has the same forward velocity in the air as the forward velocity of the board on the ground.
  3. The board should be moving constantly under the skateboarder as the friction of the ground does not affect the velocity of the board much. This allows the skateboarder to land on the board due to gravity pulling the skateboarder down.

Above is a picture of how the Hippie Jump looks like. Skateboarders usually jumps over an obstacle to make the trick seems cool. The amount of downwards force for the skateboarder to jump and a lower center of mass by crouching will determine the height of the skateboarder's jump.

Sources used:

http://www.real-world-physics-problems.com/physics-of-skateboarding.html

google pictures

by: A'

Saturday 1 August 2015

The Maglev Train(Part 3)

Hi guys,

This will be my third and final blog post of my research on the infamous Maglev Train. It is with deepest regret that I must inform you that I will not be able to recreate a live scenario of superconductivity in action. The requirements are simply too difficult and too expensive to acquire here. Instead, I will simply create a detailed power point of my research.

In my previous post, I explained how the Maglev Train was capable of levitation and I introduced something called a superconductor. This post will describe much more clearly on what a superconductor is and how it levitates.

Superconductors were by discovered by a Dutch physicist Heike Kamerlingh Onnes on April 8, 1911 in Leiden. But it is only till recent years that scientists were capable of utilizing it.

Superconductivity is a quantum state of matter, therefore involving some amount of quantum physics. What makes superconductors so different is that it has zero electrical resistance and it expels magnetic fields from it’s interior. This can only occur under a certain critical temperature.

A superconductor levitates when it comes in contact with a magnetic field. Superconductors do not like magnetic fields. So they attempt to expel the magnetic field from the inside by circulating currents. This process is not perfect however, causing strands of magnetic field, called fluxons, to be trapped inside the superconductor. What happens after that is the superconductor doesn’t like the strands of magnetic field left inside because they move around. This movement causes energy to dissipate, breaking the superconductivity state. So what it does is it locks these strands of magnetic field in place. But by doing so, it actually also locks itself in place. So in truth, this so-called levitation is actually quantum locking, which is the superconductor being lock in place in mid air.

Thank you for reading my posts. It has been a wonderful time sharing my research.

Justin

Now it is time for my final blog post. I have been going on around looking for good parts for my hovercraft but I have yet to find most of the parts. This is one of the struggles of having to live in a small town. No matter the problems though, I shall keep looking around for the parts before my final presentation. However for building any hovercraft you have to consider some simple suggestions.

Firstly, don't make you hovercraft too high. The hovercraft would topple very quickly. The balance would be too hard to balance and also it would look funny.
Secondly, I suggest making your hovercraft with light materials, not the superheavy materials cause then you would not get any lift off.

Thirdly, I would not suggest using computer fans as the fans, they don't create enough lift and the battery needed to power them would add to the weight.

So these 3 simple suggestions should help you in building your hovercraft. You can also visit my first blog and watch the link I put there for a tutorial in building a hovercraft. And one last suggestion is too make sure there is a good store near you where you can find an abundance of parts for your hovercraft. I hope this blog was able too help you and I hope you have better luck then me in building your new hovercraft. Bye all!!!! :-) :-)

Friday 31 July 2015

Music Production, Sound Design & Audio Mixing (Part 2)

 In my last post, I explained how sound waves play a part in sound designing and how understanding some of the properties (Amplitude and Frequency) help with producing music and designing sound. In this post I'll be making a basic explanation of what is used to produce music and each of its functions. Most music nowadays (especially Electronic Music) is produced mainly on the computer, through the use of a software called a Digital Audio Workstation (D.A.W.).


There are various DAWs on the market. An example: Steinberg Cubase - is widely used by professional musicians and music producers - e.g. Hans Zimmer
 A DAW basically allows you to edit, record and mix audio within a single program. It mainly consists of a mixing console, an audio sampler, a sequencer (which is where the digital audio files are sequenced), a piano roll and an audio converter. DAWs are also built to load software synthesizers and effects and are also designed to support MIDI, which is a format of stored instrument data. It doesn't make any sound on it's own and is simply used to trigger or modify sounds. Allowing a musician to create or play music using virtual instruments by using a MIDI keyboard or the piano roll view. Other types of widely used DAWs besides Cubase are Ableton Live, FL Studio, Pro Tools, Apple Logic and Propellerhead Reason, their basic functions are the same. But each one is designed to have a different workflow from one another. My preferred DAW is FL Studio, because of it's rather simple workflow. I'll demonstrate these features and their functions in my presentation.

 Anyway, That is all for this post. Thanks for reading!

- Dareil


Physics of Running (Part III)

My previous post was about pendulums and how they relate to the physics of running. Today, i would be talking about the proper sprinting techniques from head to toe! :) First of all, you have three phases, the starting phase, the acceleration phase and the maximum-speed phase.

The Starting Phase
To be a good sprinter for distances such as 100m, you must be able to have a quick start. To be able to have a quick start, your weight must be equally distributed over your hands and feet. When the gun is shot, your forward leg pushes the ground while straightening the other leg causing your body to be in a striding position. Push hard with both hands and stay in a stride position.

The Acceleration Phase
It is known that all sprinters are given this tip, which is to stay in low stride position for about 20m. After 20m, you should slowly get up into your normal running position. When you are in your normal running position, all you need to do is relax your neck and shoulder muscles and keep your eyes towards the finishing line.

The Maximum-Speed Phase


When running, both your legs should touch your butt, and you should only be running on the balls of your feet. That is when you know that you are using all the energy you have.

Your hands should be swinging up to your shoulder's height and stammering back until your fingers are at your pockets. Your neck, shoulders, and head should still be relaxed with your mouth slightly opened.


Shoulders/Head
Keep your shoulders & head relaxed to avoid lateral rotation. Lateral rotation means to turn away from the midline of the body.

Hips
Keep your body upright. However, allow your hips to rotate as it is a natural thing.

Knees
Allow your knees to push forward and reach up high as this would generate more power. How? It would allow you to have longer strides. Therefore, covering more distance.

Feet
Your foot should be underneath your body, not in front and you should be running with the balls of your feet.

Arms
Your arms should be loose and moving in a 90 degree position. It should swing forward, stopping when your fingertips reach your pockets.

Heels
Heels should not be on the ground when running.

Now, you all know the techniques for sprinting, so you use it for the upcoming sports day!!

Physics of Running (Part II)

Today, i will be talking about the theory of pendulums. As you all know, during running, our legs and arms work as pendulums. How? Let me explain it that to you.


First of all, a pendulum is a weight, hung from a fixed point so that it can swing forward and backward easily like shown in the diagram above. There is an important thing we need to know about pendulums which is, the fact that the mass of the bob does NOT affect the speed of the pendulum. It is the length of the rod that matters most because the shorter the rod, the faster it travels. This is due to the gravitational rate of all objects, which is about 9.8m/s. This means that all objects fall at a speed of 9.8m/s, no matter how much it weighs.

You may be thinking, why would a shorter length make the speed of the pendulum to increase? This is because, a short pendulum has a narrower arc, and is able to convert G.P.E to K.E in a shorter period of time.

Now, lets apply this to your legs.
Imagine your legs as two pendulums. Your feet is the bob and your hip is the pivot. Think about it. If you run with your knees locked, it would be harder than if you ran with your knees bent. The rate of converting G.P.E to K.E is very low because you can't bring your legs up high but with your knees bent, you would be able to bring up your legs much higher to achieve more P.E.
If you look at some of the best sprinter, you would see that they raise their knees up high during a race. This makes them faster.

The Physics Of Ice Skating (Part 3)

In today's blog post, I will be going through several phenomenons that occur during ice skating!

Angular and Linear Momentum

Angular momentum characterizes an object's resistance to change in rotation. The basic idea is the same as with linear momentum, moving objects like to keep moving, and to change their motion we have to apply a force. If no force is present then the momentum does not change. In the case of rotation the force is called torque, applying torque to speed up rotation and decreasing torque to attain a slow rotation. When torque is applied the angular momentum increases. It slows down as time passes due to frictional torque, this is similar to friction in linear momentum. As in the case of ice skating this frictional torque is very little, because of the ice and the thin blades of the skate shoes, the skater is nearly friction less when in contact with the  ice.

Rotational Inertia

For  straight line motion, inertia is referred to as mass. For rotational motion, it's a little more. It's harder to make a given mass rotate around an axis if it is further from the axis than one that it's close to. 

E.G Coin Spinning and Stopping a Turntable Disc

Spinning a smaller coin will result in more spins, which means a faster speed, due to the fast speed it takes longer to fall. However spinning a larger coin will result in less spins and because of the slow momentum it has it loses its rotation around the axis quicker and falls flat much sooner than a smaller coin. Also the bigger coin needs more energy to produce 1 spin as compared to the smaller coin so the bigger coin loses energy at a much faster rate.


Stopping a disc that is being played on a turntable, you will find that it is much easier to stop a disc rotating by placing your finger at the border of the circle, but as you get closer towards the center of the disc it is much harder to stop the rotation, this is because you are moving closer to the rotational axis.


Summary

-Rotational inertia characterizes the resistance to change in rotation
-Torque is the type of force which makes something rotate
-Angular momentum is conserved if there is no net torque on an object. A change in rotational inertia is compensated by a change in rotation speed.

Thanks for reading my final blog post!